

Enhanced Conversions improve Google Ads tracking and your paid search campaign performance by sending hashed customer data (like email, phone, or address) with each conversion. This increases match rates, helps recover conversions lost to browser restrictions, and improves Smart Bidding.
This guide will cover:
- Enabling Enhanced Conversions in Google Ads.
- Setting up Enhanced Conversions in GTM for lead-gen forms and ecommerce purchases.
- Handling different form types ( page redirects using dataLayer push or static forms).
- (Improving reliability with Server-Side Tagging (SST) using Stape.
By the end, you’ll know the best approach for your site and how to confirm everything is working in Google Ads.
Setting Up Enhanced Conversions Inside Google Ads
First, enable Enhanced Conversions at the account level.
This informs Google Ads that your account is authorized to accept additional customer identifiers (such as email, phone, and address) to enhance tracking accuracy.
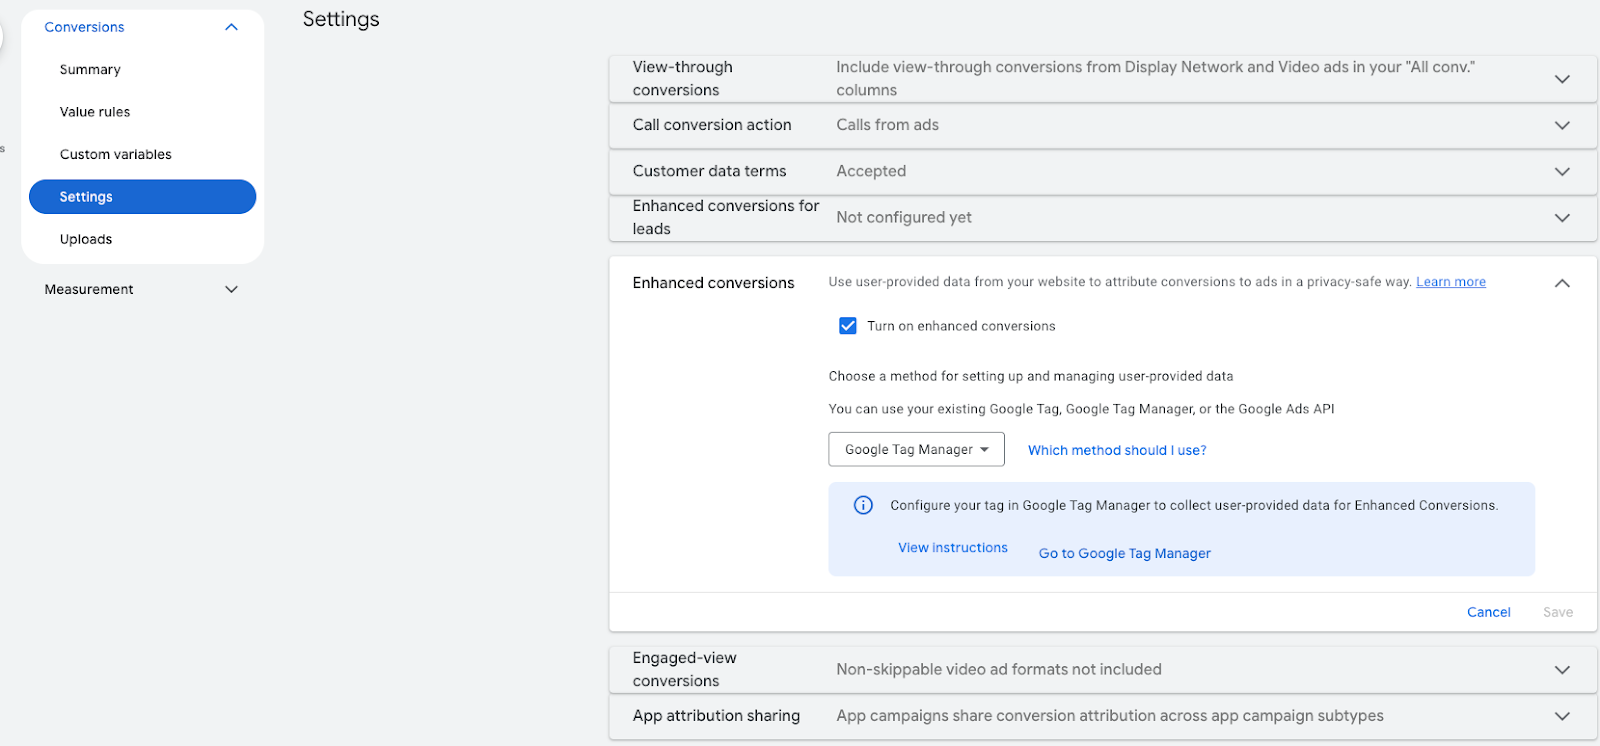
Next, enable Enhanced Conversions for your specific conversion goal (form fill, purchase, etc.). This ensures the exact conversion you’re tracking can receive and use the extra customer data you’ll send through GTM.
Configuring Google Tag Manager
Step 1: Create or Confirm Your GTM Container
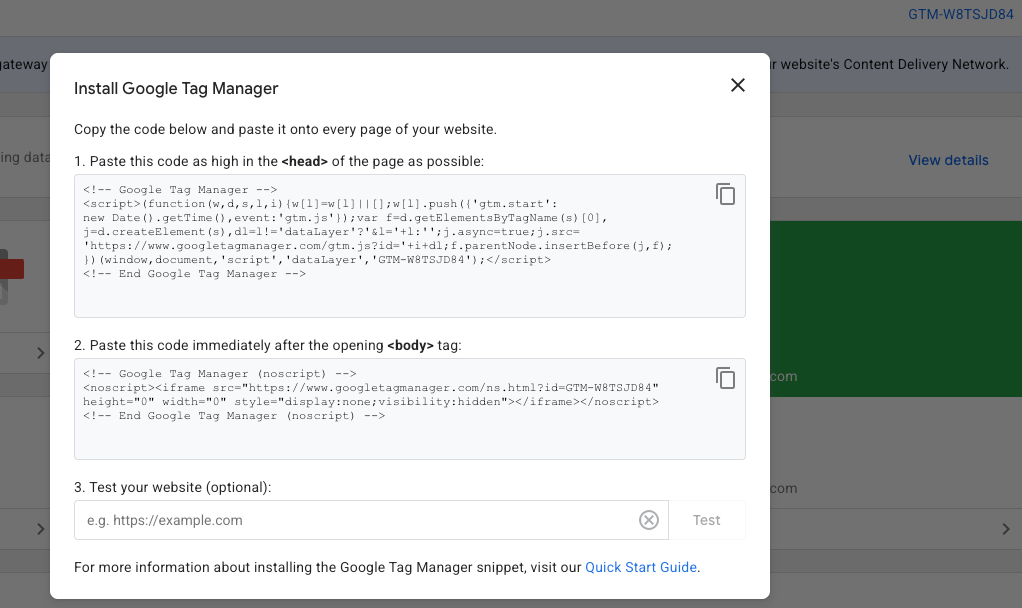
Make sure your website is running a Google Tag Manager (GTM) container.
If not installed, place the GTM snippet in the <head> and <body> of your site. You can find the snippets when you create a container and by clicking on the GTM-XXXXXXX. This will prompt as soon as you make one from scratch if you don't already have one.
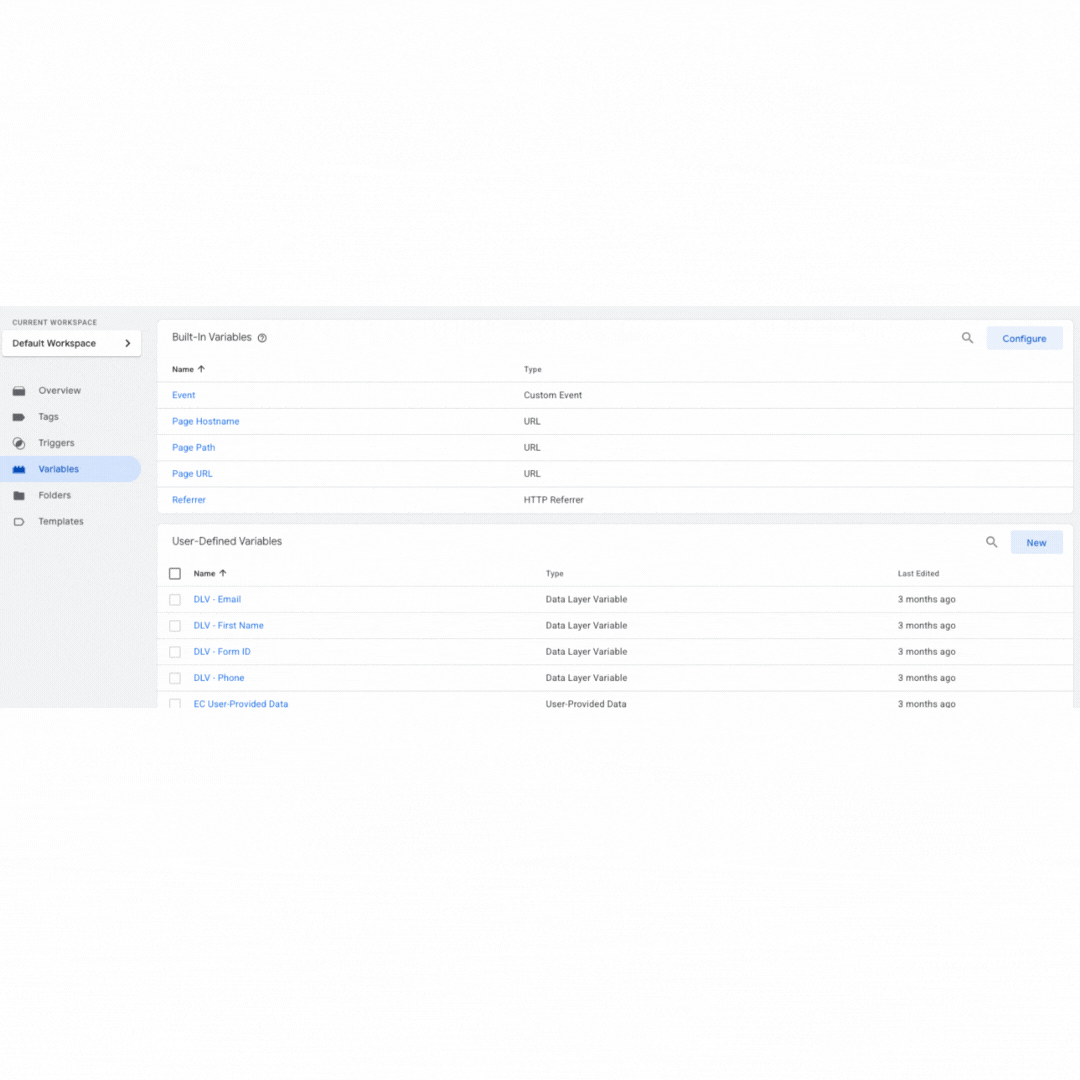
Step 2: Create Variables From User Data Fields
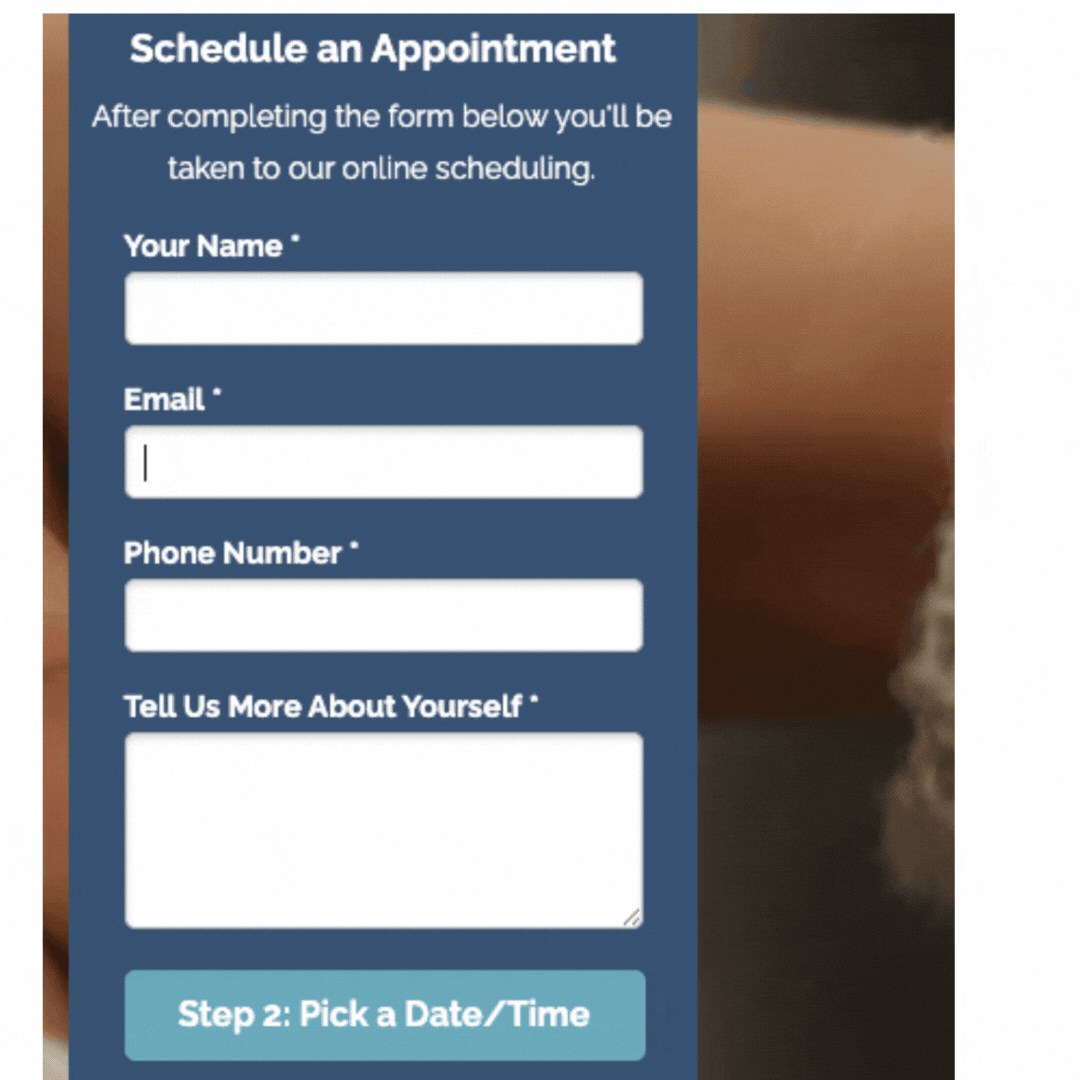
For Lead-Gen Forms
Capture the user data fields available on the form:
- Email (required for best results)
- Phone number (if present)
- Name or full address (if present). This has to be a complete set of data, or it will not capture
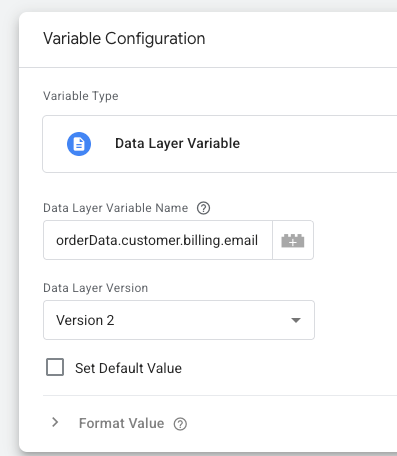
Go into your GTM and navigate to the variable section to create a new variable. You can do this by clicking Variables > User-Defined Variables > Add New. Name each variable accordingly.
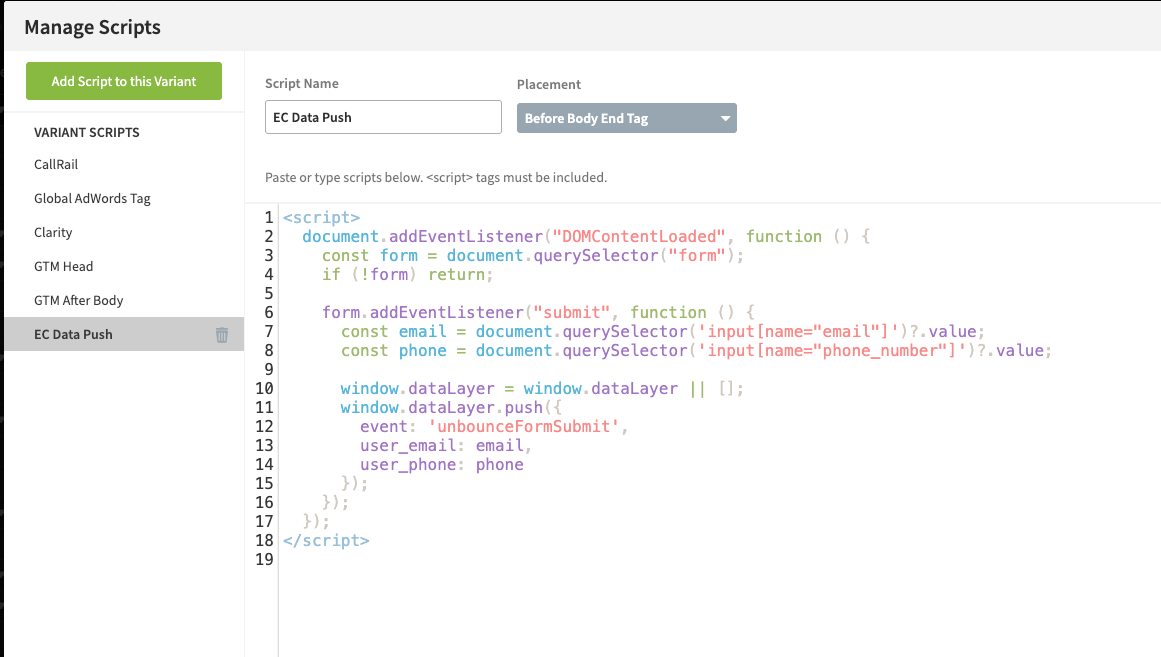
Note: Depending on whether your form redirects to the thank-you page or remains static, you may need to create a data layer.
The reason we often need a dataLayer push is that redirects break the connection between the form page and the thank-you page. Once you’ve left the form page, GTM can’t see those fields anymore. Pushing identifiers into the dataLayer ensures they’re still available to the Google Ads tag at the moment of conversion.
Data layer Push Example:
Tip: You can insert your elements into LLMs to help you determine what you need if you are not technical.
If you are using a data layer, please use the Data Layer variable type when setting it up in GTM. If your form is static and information is made available at the time of conversion, use the DOM element variable type.
Step 3: Identify Your Trigger/Confirm Data Layer
Perform a test action (such as form submission for lead generation or purchase for e-commerce). Use Google Tag Assistant (in Preview mode in GTM) to view which events fire.
- Lead generation → Trigger on the form submission event or the thank-you page load.
This trigger ensures the Google Ads tag fires only when a conversion has actually occurred and the necessary user data is available.
If you added a data layer, you want to see that in the GTM Preview or Google Tag Assistant Test.

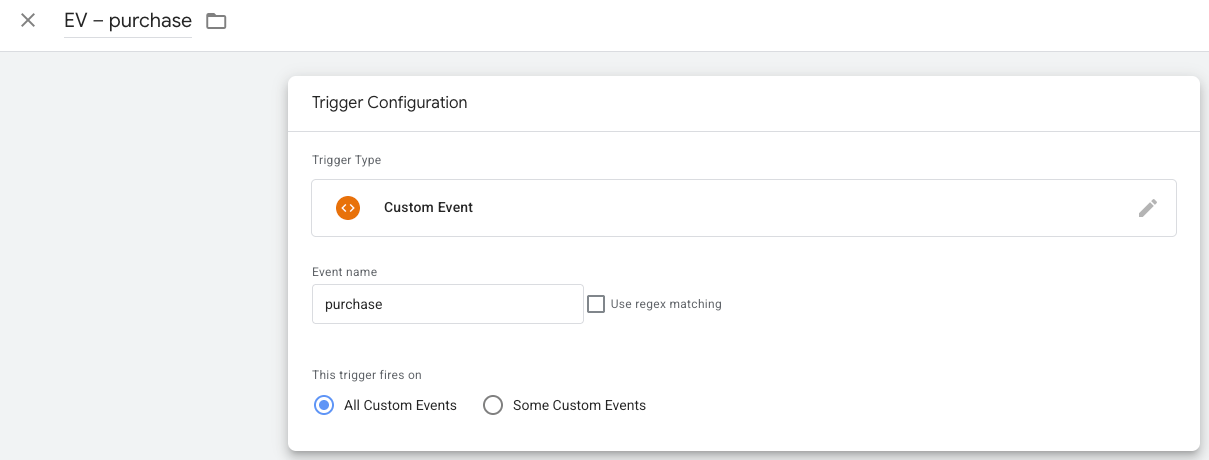
Step 4: Create Your Trigger in GTM
We’re using a Custom Event trigger (unbounceFormSubmit) instead of a generic form submission because Unbounce pushes its own event into the dataLayer when a form is successfully submitted.
This ensures the tag fires only on a true conversion event, not on partial form interactions or failed attempts.
The conditions (DLV – Email and DLV – Phone match RegEx .+) make sure that the trigger only fires if those fields actually contain values.
This protects against empty submissions and guarantees that the Enhanced Conversions tag sends real, usable identifiers to Google Ads.

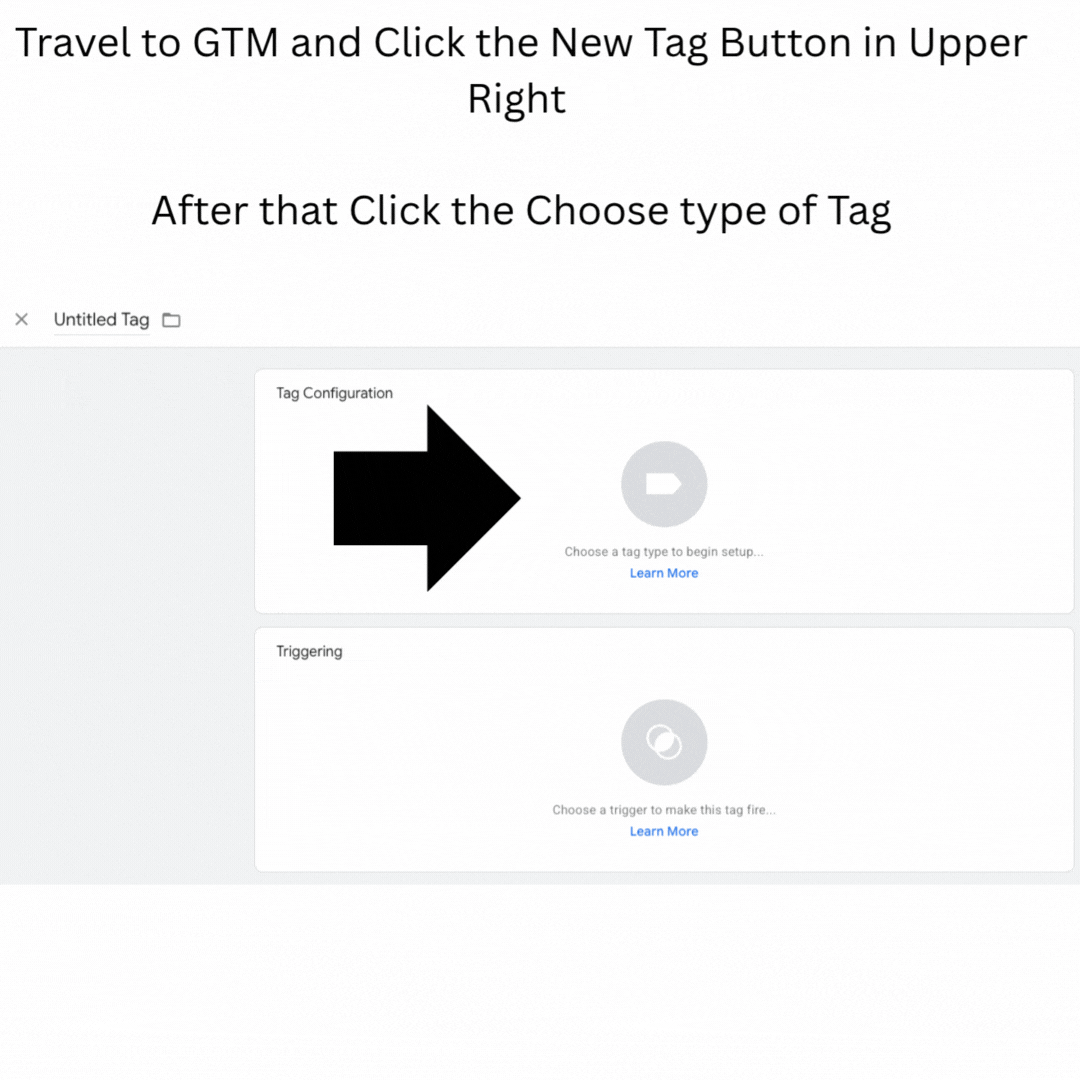
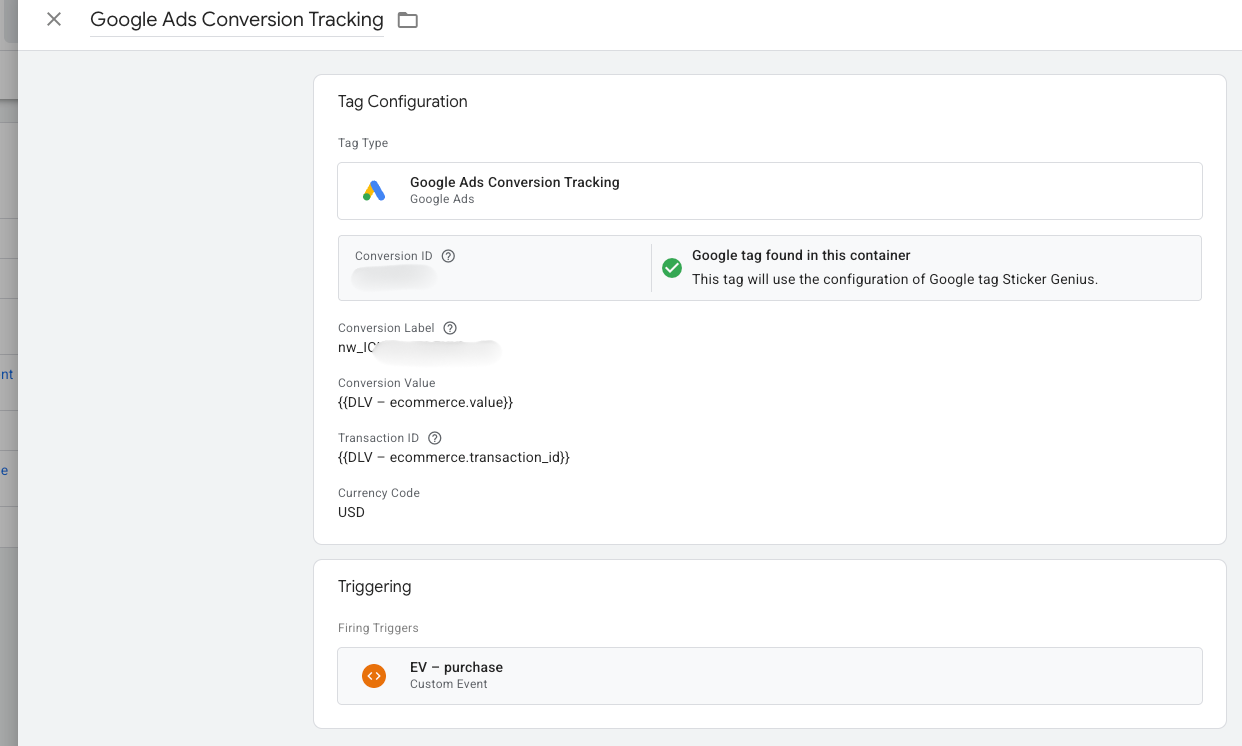
Step 5: Create the Google Ads Conversion Tag in GTM
- In GTM, click New Tag → Google Ads Conversion Tracking.
- Enter your Conversion ID and Conversion Label from Google Ads.
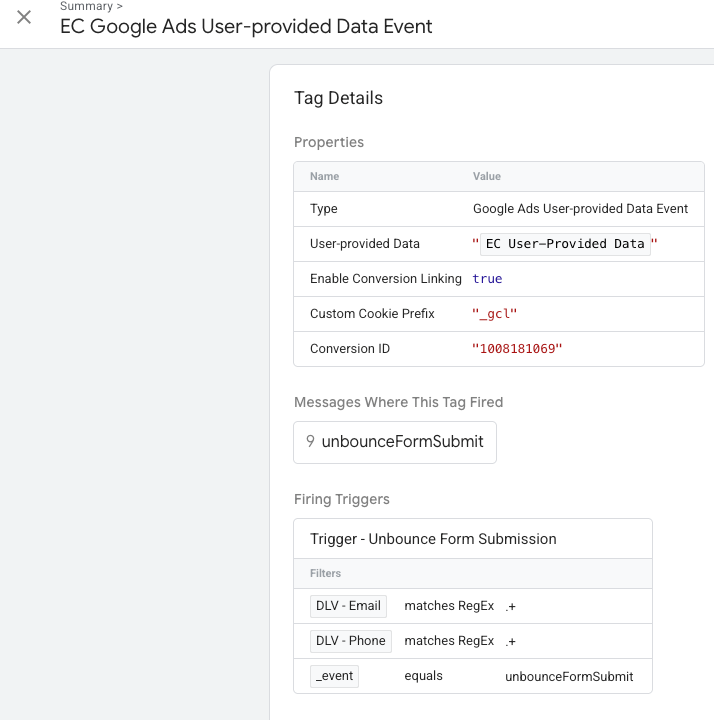
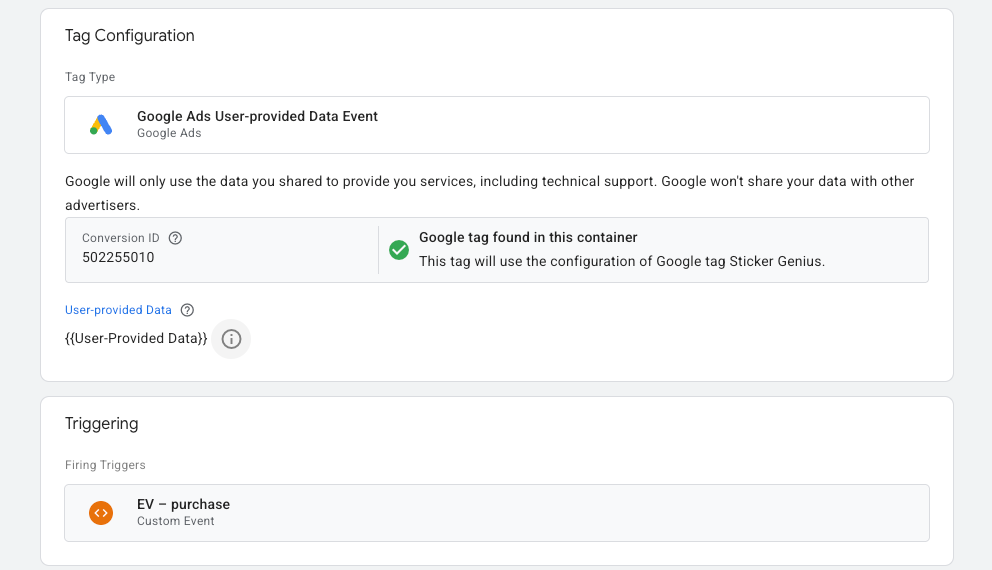
- Do this as well for the User-Provided Data Tag
- Map your variables for the User-Provided Data Tag:
- Attach your trigger (such as a form submit, purchase event, or thank-you page).
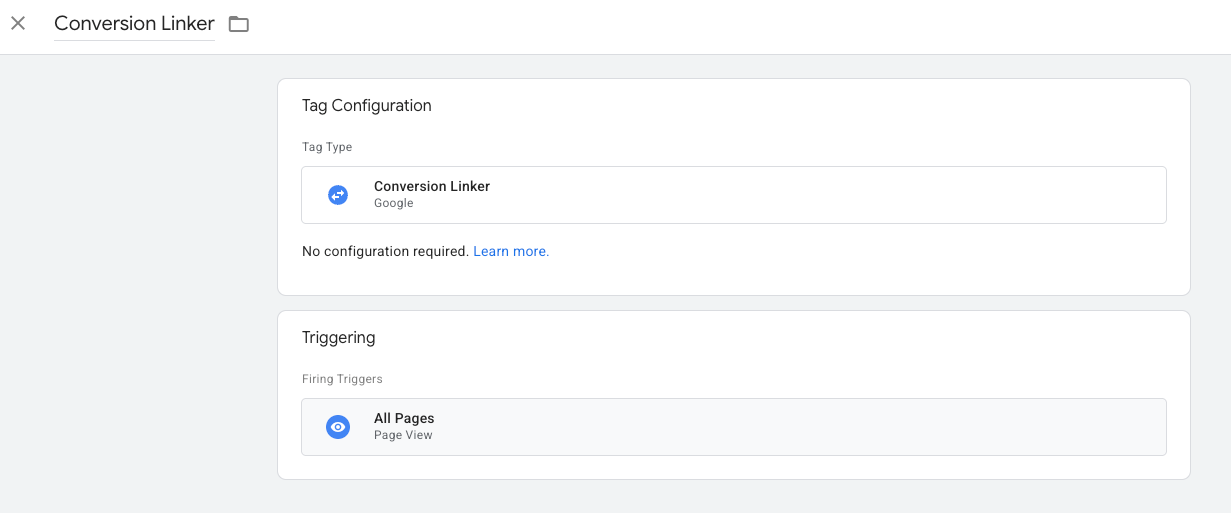
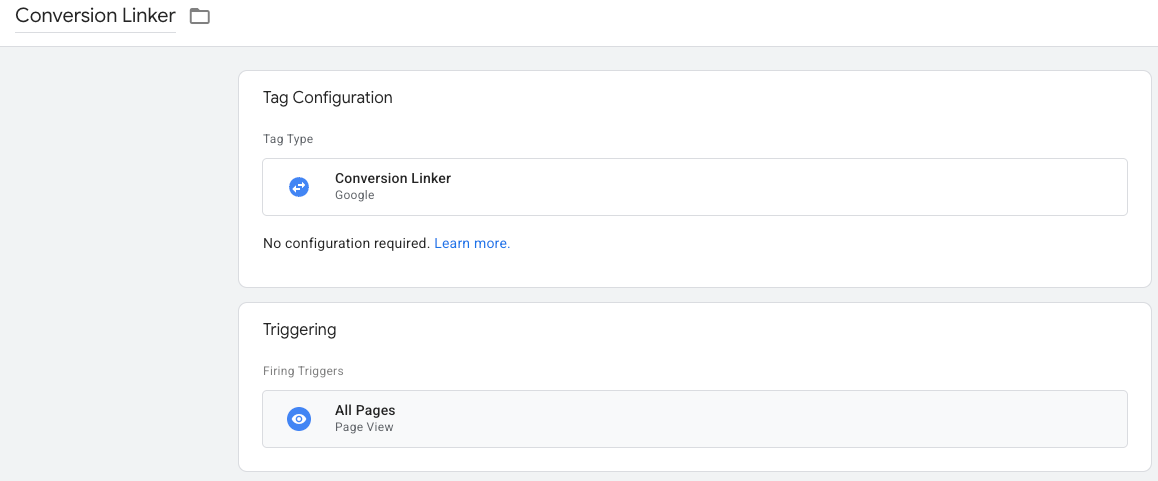
This is what your conversion linker should look like, triggered on all pages.
Step 6: Test in GTM Preview Mode
- Publish your GTM changes.
- Enable Preview in GTM.
- Submit a form or complete a test checkout.
Confirm the Google Ads tag fires.

Check all the Tag Details
Step 7: Verify in Google Ads
- Publish your GTM changes.
- Make sure enhanced conversion is turned on in Google Ads
- Wait 48–72 hours for Google Ads to process enhanced conversions.
- Go to Tools & Settings → Conversions → Diagnostics.

Setting Up Enhanced Conversions for eCommerce
Enhanced Conversions for eCommerce use the same logic as lead-gen, but instead of firing on form submission or custom events, you fire on the purchase confirmation event. In addition to user identifiers, you should also send the transaction ID and transaction value.
To start the process, go through the entire checkout and purchase experience using Google Tag Assistant. This will give you access to the data layer to find your variables and purchase event.
Step 1: Locate Your Purchase Event

Step 2: Grab Your Data Layer Info
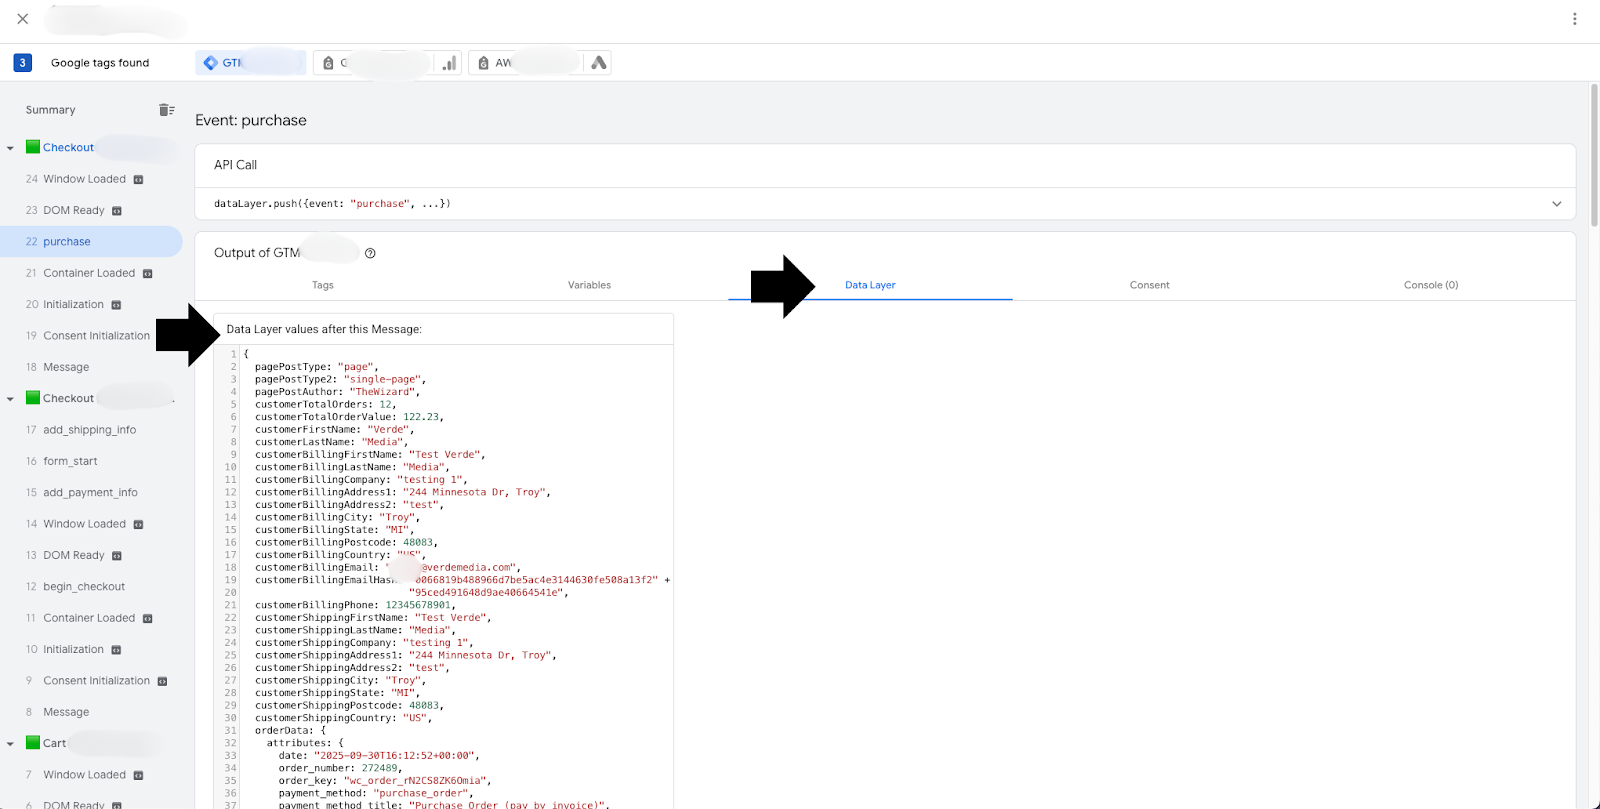
Step 3: Copy and paste that info into a Document to make it easier to get your variables.
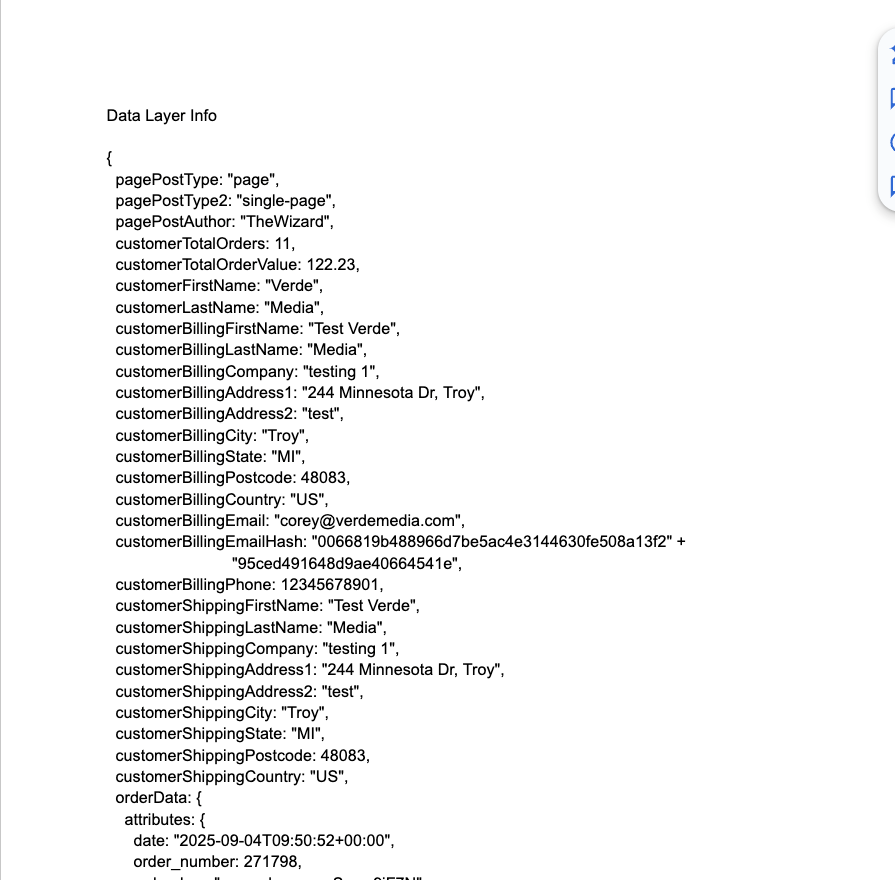
Step 4: Create The Variables
This will allow Google Ads to populate conversion value for your campaigns and send the enhanced conversion data.

Variables will depend on what your data layer has, but these are the ones you have available for Google. These variables will be used for our User-Provided Data tag.
- Email (required for best results)
- Phone number (if present)
- Name or full address (if present).
Step 5: Create Your Trigger
Create your trigger using a custom event, specifying the event name precisely as it was identified in Step 1.
Step 6: Google Ads Tag & Conversion Linker
Create your Google Ads Conversion Tracking tag and insert your Conversion value, Transaction ID, and Currency Code variables.
You will still need to set up your User-Provided Data Tag and attach your user-provided data variables. This tag will allow Google to receive the enhanced conversion data.
Conversion Linker
Do not forget the Conversion Linker tag. The conversion linker tag stores Google ad click information (such as gclid parameters) in first-party cookies on your website, allowing Google's advertising platforms to track conversions accurately. For optimal results, leave your trigger set to “All Pages”.
Step 7: Test in GTM Preview Mode
- Publish your GTM changes.
- Enable Preview in GTM.
- Submit a test checkout.
- Make sure your Google Ads tags fire
- Verify that your variables contain the correct data.
Step 8: Verify in Google Ads
- Ensure enhanced conversions are turned on in Google Ads.
- Wait 48-72 hours for Google Ads to process enhanced conversions.
- Go to Tools & Settings → Conversions → Diagnostics.
Give Google Ads More Context For Success
Enhanced Conversions strengthens your Google Ads tracking by securely sending hashed customer data—like email, phone number, and address—alongside each conversion. This improves match rates, recovers conversions affected by browser restrictions, and optimizes Smart Bidding performance. Implementation requires enabling Enhanced Conversions in your Google Ads account, then configuring Google Tag Manager with the appropriate variables, triggers, and conversion tracking tags. Whether you're tracking lead-gen forms or ecommerce purchases, the setup process involves capturing user data fields, testing with GTM Preview mode, and verifying results in Google Ads diagnostics after 48-72 hours. Following this guide ensures accurate conversion tracking and improved campaign performance.