Learning Hub | Maintaining Your Website
How To Use WordPress 101- Part 3/3
September 5, 2016 | Jon Teodoro
This article is part 3 in a series. In this article, we will cover how to add, edit, and delete posts and pages in WordPress.
Click here for part 1. Click here for part 2.
Create Posts
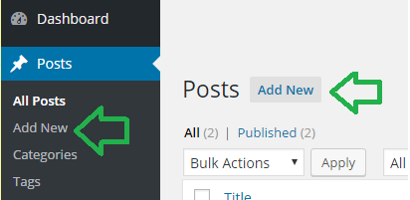
To create a post, first log in to your WordPress dashboard, then click on Posts in the left menu, then click on “add new”.
Enter your title in the title box. If you have permalinks set to “post name,” your title determines your permalink. You can edit the permalink by clicking on “edit” next to it.

Once you’ve entered your desired title, click into the larger box below and enter your post content. Make sure you’re in the “visual” tab (to the right) so that you can add styling to your text. If you have any knowledge of HTML, you can click on the “text” tab and edit the HTML there.
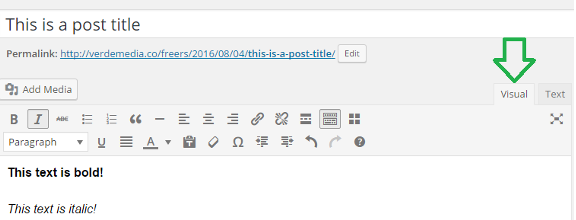
There are a few different options here. You can make your text bold by highlighting it and clicking on the “B” in the toolbar. You can make it italic by clicking on the “I”. There are other options on the toolbar such as strikethrough (puts a line through the text), bulleted lists, numbered lists, text alignment, links, etc. Hover over an icon to find out what it does.
From this page you can also add categories, choose your post format (how these are displayed will depend on your theme), add tags, and add a featured image (also depends on your theme). These options are all on the right side of the screen.

To preview your post before you publish it, click on “preview” off to the right.
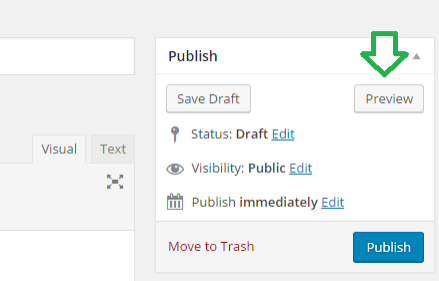
You can also save your post as a draft and edit it later, or move the post to the trash. Once you’re happy with how your post looks, click Publish.
Edit Posts
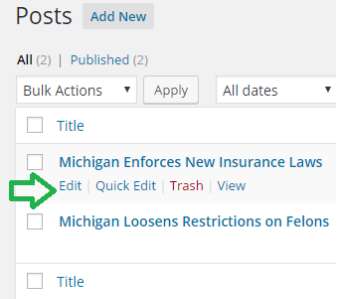
To edit a post, go to Posts and navigate to the post you want. Hover over the title of the post you want to edit and click “edit.”
The options from this point on are the same as when adding a post.
Quick Edit Posts
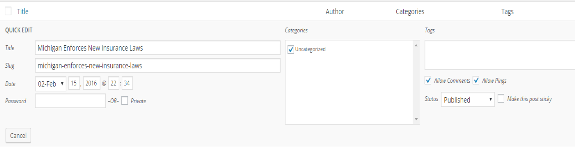
There is an option to “quick edit” posts in WordPress. Hover over the post and click “Quick Edit.” This opens a dialog on the same page that allows you to make some quick, simple changes to your post, including editing the title, slug, date published, categories, and status.
Delete Posts
If you need to delete a post, go to Posts, hover over the title of the post you want to delete, and click “Trash.” This post is not actually deleted yet, it’s just moved to the trash. Because it’s not deleted yet, no other posts can have the same permalink as this post. So if you had a post with the permalink www.yoursite.com/this-is-a-post and you deleted it and then created a new post with the title “This is a post”, WordPress would append a “2” to the permalink because “This is a post” already exists.
To completely delete a post, navigate to your trash. The link for Trash only shows up when there is something inside the trash.

Once you’re in the trash, hover over the title of the post you want to remove and click “Delete permanently.” You can also click “Restore” to restore the post (remove it from trash so that you can edit/publish it again).
Editing/Deleting Posts in Bulk
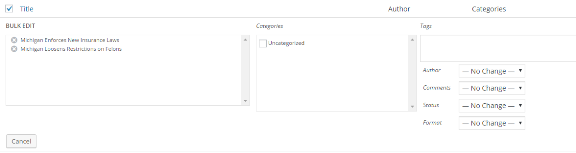
If you have many posts that you want to edit or delete, you can save time and do these in bulk. Navigate to Posts and click the checkbox next to the posts you want to edit or delete. Then click the drop down for “Bulk Actions” and select what you want to do, then click “Apply.”

From the bulk edit screen, you can change categories, author, comments, status, pings, and sticky.
Add, Edit, and Delete Pages
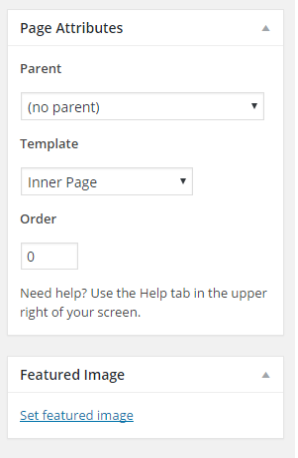
Pages work much the same as posts when it comes to adding, editing, and deleting. Click on “Pages” in the left menu, click “Add New” and enter all the relevant information. You can save a draft, preview, publish, or move to trash, just like with posts. However, Pages do not have categories, tags, or formats. Pages also have the option to select a page “template” and parent, which posts do not have.
Page parents allow you to assign a hierarchy to your pages. Pages that appear under a parent are called child pages. You may want to assign a hierarchy to help organize your content. For example, you may have one main “services” page as a parent, and a few child pages titled “delivery service,” “corporate service,” and “residential service.” You can name these pages anything you want. If your theme is set up for it, the child pages will appear under the parent pages (usually in a drop down) in your navigation menu.
Page templates are different templates in your theme that display content in different ways. You may have a page template for a full width page and one for a page with content on the left and a sidebar on the right. Page templates differ depending on your theme.
Order determines what order your pages will show up in the dashboard. The default is 0 and pages are ordered alphabetically. If you want a page called “delivery” to show up before a page called “corporate service” in your page list, you would assign “delivery” an order of 1 and “corporate service” an order of 2.